I have a secret. I am NOT a girly-girl. I'm a really simple chick. A jeans and flip-flops kind of girl. If you were to see me out, I'd be barefaced, hair up in a claw clip and the only "accessory" I'd be sporting (aside from my impossibly cute kids) would be my wedding ring.
So, when I'm making cards, I can bang 'em out when I'm following the patterns in my Make It From Your Heart booklet. (Another reason I love CTMH - they put their how-to patterns in the easiest format to follow!) But once the pattern is complete, I feel like something is missing. The cards need bling.
Embellishments, to be exact.
Take this card, for example.
I made this card for my mom and step-dad. That lucky couple is getting
to live out their dream retirement right now. They bought a travel RV
and meandered across this great nation of ours as they packed up their
house in the Frozen North and moved down to the desert of Nevada. This is an exact copy of the pattern I used from our Make It From Your Heart how-to booklet. And while it is adorable, it feels unfinished to me.
I like simple, but I like refined simple. I want the recipients of my cards to feel like I really put thought and effort into personalizing the hand made cards I give them. I won't give a card that doesn't feel "finished" to me.
So taking the basic card above, I just added a few simple pieces to make it feel more finished. I added the Twilight cardstock under the sentiments and edged all the pieces in Chocolate ink. Then, I stamped the RV image on two pieces of patterned paper, cut them out and adhered them over the original stamped image (a technique called "paper piecing"). As a final touch, I added Chocolate pearls (now-retired) to the upper left corner of the card and also over the wheel of the RV.
It doesn't scream "overly embellished" to me, but those few small, simple touches take it up the few notches it needed to feel complete.
Showing posts with label Card. Show all posts
Thursday, August 7, 2014
Friday, May 23, 2014
National Scrapbooking Month
My creative time is exceptionally precious these days. I have two months to go in my final pregnancy (which makes me a little sad to admit) and I have a very active two-year-old who wants to "help" me when I sit down to create.
Today is a gorgeous day outside. It's sunny and cool with a slight breeze - the perfect day for an 8 month pregnant lady to spend outside without getting too over-heated. So I decided to spend the morning running his little tail ragged outside so he would take a good nap and I could get some creative time in. Well I did such a good job, I got to make this card in under 30 minutes - while he was watching Mickey Mouse Clubhouse.
I am SO proud of this card!!! I love how bright and cheerful it is, I love how quickly it came together and I LOVE how it makes me smile just looking at it.
I can't get enough of the National Scrapbooking Promo - Free To Be Me. The B&T papers are so happy and I love that all the cardstock pieces are embossed on one side! I love the dimension embossed papers make to the finished product.
The pattern is from Make it from the Heart #1, our new Durables Triangle Studs, and the sentiment is stamped from our Give a Lift stamp set.
See how bright these papers are??? Make sure you get yours by May 31st by placing your qualifying order of at least $50.
Today is a gorgeous day outside. It's sunny and cool with a slight breeze - the perfect day for an 8 month pregnant lady to spend outside without getting too over-heated. So I decided to spend the morning running his little tail ragged outside so he would take a good nap and I could get some creative time in. Well I did such a good job, I got to make this card in under 30 minutes - while he was watching Mickey Mouse Clubhouse.
I am SO proud of this card!!! I love how bright and cheerful it is, I love how quickly it came together and I LOVE how it makes me smile just looking at it.
I can't get enough of the National Scrapbooking Promo - Free To Be Me. The B&T papers are so happy and I love that all the cardstock pieces are embossed on one side! I love the dimension embossed papers make to the finished product.
The pattern is from Make it from the Heart #1, our new Durables Triangle Studs, and the sentiment is stamped from our Give a Lift stamp set.
See how bright these papers are??? Make sure you get yours by May 31st by placing your qualifying order of at least $50.
Thursday, July 25, 2013
A Perfect Day
Today I registered my oldest son for Sixth Grade. My baby is now officially a Middle School-er. I always get nostalgic at the start of each school year - he starts school in a week and a half. I realize that we're riding the downward summer slope toward fall and colder weather. And while I always get excited about all the fun activities and holidays that the end of the year brings, there is something that's pretty sad about the ending of summer. I love the L-O-N-G days that we get in summer. I love being able to watch my kids playing outside at 8:30 at night in the warm summer evenings, catching frogs and fireflies. I love being able to take the baby on a neighborhood walk and show him all the evening creatures that come out to play.
I was asked to create the following card for the friend of a family member who loves the beach. When I saw this lighthouse stamp, I didn't see a warm summer day playing in the surf. I saw a summer sunset full of lingering memories.
I can't tell you how much I love how this lighthouse card turned out!
I used the card pattern from our Make It From the Heart how to program. If you don't have this great booklet, you need to get it! It's a 48 page booklet FULL of scrapbooking layouts and card patterns (with all the dimensions given). These days my creative time is short and therefore even more precious to me. Having go-to patterns and layouts really helps me maximize my time.
The first thing I did was stamp and emboss the lighthouse. Then I stamped it out on Post-it notes so I could cut out around the stamp and layer the ink on the cardstock without ruining the lighthouse. I started from the bottom of the lighthouse and layered the warmer inks - you can really choose any shades you want, I stuck with pink and peach toned inks. The best thing to do (I've found) is to start with the lightest shade and finish with the darkest shade. You don't have to clean your brayer between inks, which makes the blending process easier. But when you switch colors or if you go from darker to lighter, you really need to clean your brayer (I just clean the ink off with a baby wipe). Then when I was happy with the way the bottom of the sunset looked, I flipped the cardstock, cleaned off the brayer and layered the cooler shades. To finish off the lighthouse, I used our blending pen and colored in the top of the lighthouse, the roofs of the keepers buildings and the grass/stone. The blending pen really is great for coloring if you don't have the markers. Then I used the pink and the yellow B&T papers from our retired Mayberry paper pack to frame the picture.
I love how warm and soft the finished card is. Not that I've ever been, but this is sort of how I imagine a Maine sunset would look behind a lighthouse.
I've entered this card in the H2H Water, Water, Water Challenge, Happy Campers Challenge #20 - Summer and Dream it Up's Summertime, Sparklers and S'mores Challenge.
Sunday, July 21, 2013
Words of Comfort
I went to my stash to get a card to send her to let her know I was thinking about her. (Unfortunately, I couldn't make it to the visitation.) Several years ago, the group of girls I started scrapbooking with, created a card swap dinner. We'd get together on a regular basis and pick different themes for each swap. I just hoarded the cards, so I was certain I had something perfect in my stash to send to her. (We haven't done this in a while and I REALLY miss it!)
I mean, look at all those cards! Every one of them is handmade with love and - nothing. Not a single condolence card in the bunch - not even a "Thinking of you". What's a girl to do?? Make one! So I went into my other stash and pulled out all my stamps! Luckily, I'm a card maker and I have dozens of sentiments.
Here's what an uninterrupted hour of baby-free time looks like:
I just love how this card turned out!!
These days, whenever I'm making a card, the first thing I do is pull out our Make It From Your Heart how-to program. It's a 40-ish page booklet CHOCK FULL of patterns - complete with cutting instructions! From a design aspect, I love having pre-determined patterns when I'm crunched for time. It really helps me make the most of my creative time. And I love that it's small enough to slide into my bag when it's time to get together with my girls and crop!
I used the B&T papers from our retired Moonlight paper pack. It's Halloween-themed, but I think the muted Slate and Smokey Plum colors were just perfect for this card. I wanted to keep the card simple so I pulled a few techniques out of my bag of tricks.
One of my all-time favorite stamps is Treasure Life. It's a long-retired stamp set, but between the floral images and the sentiments, it is one of the most useful stamps that I own. I used it to stamp the background image on the card. For the stamped background image, I used Second-Generation Stamping. If you've never done it before, Second-Generation Stamping is where you load up your stamp with ink - get it good and juicy - and you stamp the image on the paper. Then, you reposition it and stamp it again on a different spot. This gives you a lighter stamped image and I think it also adds some interesting dimension to the card. (You can see above, it looks like there are floral stalks behind the darker stamped image.) I also embossed the three floral stalks in the front. For the sentiment on the front of the card, I used our Words of Comfort stamp set, which I corner-rounded on opposite corners. Before I embellished the card, I edged the two B&T pieces and the sentiment with Slate ink and edged the two Smokey Plum cardstock pieces with Smokey Plum ink. Then I finished off the card by embellishing it with our retired Colonial White Grosgrain Ribbon, Licorice Opaques and a Filigree Charm. I used Liquid Glass to glue the Opaque and the Charm to the Ribbon and then the Ribbon to the card. My regular ATG usually doesn't fail me, but I wanted to make sure it all stuck well. The only thing about Liquid Glass is that you have to let it dry for a long time before touching or moving it. I usually let my projects set for 24 hours to be on the safe side.
I hope you like the card as much as I do.
Thursday, June 27, 2013
Welcome Baby Boy
I LOVE this card! I might be a bit biased, cuz I made it. And although I rarely make things I don't like, I don't always fall in love with some of my creations like I did with this card.
I don't think there are enough adjectives to describe how awesome I think this card is. I love that the emphasis is on the mother and pram. She looks blissful and peaceful - just the way we all want to look when we're pushing our little angels around. I love that it's simple. I love that it's elegant. I love that it's "boy-ish" without being "baby-ish".
I made it for my younger sister when she was pregnant with her third son.
First, I used our Later Sk8r paper. (All current product is soon to be retired. Later Sk8r is only available through July 31st, so order yours here before they're all gone.) I love when CTMH brings out new boy papers! I paper pieced the mother's dress and the baby's pram from two of the patterned papers in the pack. I used our blending pen and inks to color in her hair, skin, shoes, and the baby's arm. I added bling to hear ears and the middle of the wheels. I traced over the wheels, spokes and handle of the pram with our silver metallic pen to give it the appearance of being made from metal. I layered Lagoon, White Daisy and Outdoor Denim cardstock on top of each other to create a visually beautiful background without competing with the stamped image. For the strip of Outdoor Denim behind the stamped image, I used our Color Ready Seam Binding Ribbon and daubed Outdoor Denim ink all across it. But be careful! If you do this, you have to color it on scrap paper and you HAVE to let it dry for 24 hours before using it. Otherwise, you'll get ink all over you and your project. I also added a few pieces of bling to the bottom of the card as a finishing touch.
I hope you like it as much as I liked making it.
Labels:
4.25 x 5.5,
Baby,
boys,
Card,
CTMH,
Later Sk8r,
My fave things
Wednesday, May 8, 2013
May's National Scrapbooking Promotion
It's our National Scrapbooking Promotion for May. The colors are bright and cheerful. The colors and the patterned papers were exclusively created just for this promotion. Even the cardstock is double-sided. One side is the high quality CTMH cardstock that you know and love. The reverse side has a delicious embossed pattern to add depth to your paper crafting projects.
Make It From Your Heart Buzz and Bumble Thank You card
I've been commissioned by my husband's mother to make a box of cards for her friend's retirement party. I did this for her birthday earlier this year, and she really appreciated it. She called me on Sunday and asked me if I could have this ready for her before Saturday. As in this Saturday. Three days from now. I told her it could be done. And it can, as long as my boys cooperate. This has been a busy week for us and I've had family business to take care of up until today, so I've been slowly working on this card.
I used our new Buzz and Bumble paper pack to make this card. I edged all the papers in Cocoa Ink to give it more dimension without the added weight of more paper. The flower on the sentiment is from the Buzz and Bumble Assortment Pack. I stamped the sentiment with our A Little Thanks stamp set. The sentiment I edged in Goldrush Ink and Cocoa Ink to help make it pop.
Knowing that I have three days to get a box of cards (and the box itself) designed and created, would normally turn me into a frantic mess. But Close To My Heart has the perfect solution for this. They have this wonderful 48 page booklet called Make It From Your Heart. They've created exclusive card (and scrapbooking) patterns and included dimensions and completed examples of each project. And that's where I got the pattern for this card.
This is a Must-Have booklet to keep with your paper crafting supplies. The pre-designed patterns make creating so much more of a breeze. And it makes keeping my commitment less stressful. I bought this booklet because I have a little one at home. He makes it impossible to spend hours online scouring websites and blogs looking for card patterns. You can order yours here today to maximize your scrapbooking and card making time!
I already have the next pattern, stamp and paper pack picked out for the next card. Come back tomorrow to see it.
I used our new Buzz and Bumble paper pack to make this card. I edged all the papers in Cocoa Ink to give it more dimension without the added weight of more paper. The flower on the sentiment is from the Buzz and Bumble Assortment Pack. I stamped the sentiment with our A Little Thanks stamp set. The sentiment I edged in Goldrush Ink and Cocoa Ink to help make it pop.
Knowing that I have three days to get a box of cards (and the box itself) designed and created, would normally turn me into a frantic mess. But Close To My Heart has the perfect solution for this. They have this wonderful 48 page booklet called Make It From Your Heart. They've created exclusive card (and scrapbooking) patterns and included dimensions and completed examples of each project. And that's where I got the pattern for this card.
This is a Must-Have booklet to keep with your paper crafting supplies. The pre-designed patterns make creating so much more of a breeze. And it makes keeping my commitment less stressful. I bought this booklet because I have a little one at home. He makes it impossible to spend hours online scouring websites and blogs looking for card patterns. You can order yours here today to maximize your scrapbooking and card making time!
I already have the next pattern, stamp and paper pack picked out for the next card. Come back tomorrow to see it.
Monday, May 6, 2013
Super Cute Dream Pop card
This is the super-simple, super-girly Mom's Day card I made with our National Scrapbooking Month Promotion, Dream Pop! I'm pretty laid-back and low-key. And I love how bold and colorful these papers are. But I felt like I needed a solid neutral to ground all those happy colors, which the black did perfectly.
Look at all these bright papers!
The cardstock is double sided. That pattern you see in the pictures is actually embossed! It adds great dimension to your finished project. The reverse is plain cardstock, so you can stamp images and sentiments to your heart's content!
And look at all these colorful patterns! The reverse have completely different patterns and designs to add more dimension and color to your projects.
This is a fantastic promotion to celebrate National Scrapbooking Month. You get 24 sheets - 2 each of all six double-sided patterned papers AND 2 each of all six double-sided cardstock papers. If you love paper-crafting as much as I do, you really need to get your hands on this promotion. It's only good through the last day of May. The papers are so high quality and it was so much fun to work with pre-embossed cardstock!
All you need to do is place a $35 qualifying order here and you can get this fantastic promotion for only $10!!
Tuesday, April 23, 2013
My Sunshine "You're Tweet" Masculine card
I think this turned out to be the cutest card to tell my husband I'm thinking of him! He works midnights and I like to sneak a card into his duffel before he leaves for work from time to time. He usually finds it sometime during the night when we're sleeping. It's important to me to let him know how much I love him and how important he is to me. I know his work schedule is hard on him (and our marriage and our family). Not only does he have to work the graveyard shift, but some of the responsibilities he has for his job requires him to work days as well, which means 16 hour shifts and LOTS of lost sleep! He needs to know how appreciated he is for how hard he works to take care of our family! And I'm always looking for cute masculine cards that also appeal to me. And this card is certainly appealing.
I used our adorable Stamp of the Month - My Sunshine. If you haven't ordered yours today, you only have until the end of the month! The Stamps of the Month are exclusive stamps only available during their particular month. Once the month is over, they're gone! I have seen so much beautiful artwork with this stamp - and I have a crop coming up this Saturday. (over 12 hours of uninterrupted creating, I'm getting more excited the closer it gets!!) Look for more artwork next week. But you should make sure you get yours before it's too late!
For this card I used the papers from our Buzz and Bumble paper pack. I love how striking and masculine this card turned out to be.
I got the pattern from page 43 of Make It From Your Heart, the Close To My Heart pattern program. If you don't have it yet, please, please, please get it. It's fantastic! It has scrap booking and card patterns. It gives you final measurements for the projects and gives adorable completed projects to showcase how you might use the designs. But you know - you're only limited by your imagination. I love using Make It From Your Heart when I want to be creative, but I have a time crunch or my munchkins aren't being cooperative. It's easy to use, easy to understand and only 48 pages, so it conveniently tucks everywhere without taking up a lot of space - leaving more room for creating.
Hope you like it as much as I liked making it!
Wednesday, April 17, 2013
Crazy for Cars Retiform card
I have LOVED this technique since the first time I saw it
YEARS ago. And it’s SO EASY!! All you need to create this technique are –
Post-It’s! I have two boys (and 10
nephews), so I am especially fond of anything I can use to make little boy
cards and projects. And I love, love,
LOVE cards that are SUPER simple to make and have a great WOW factor when they’re
finished!
All you need to complete this card, are:
-Outdoor Denim Cardstock – cut to 5 ½ x 8 ½ (Scored halfway
down its length to make the final card dimensions 5 ½ x 4 ¼)
-Pear Cardstock – cut to 3 7/8 x 5 1/8
-White Daisy Cardstock – 2 pieces cut to 4 x 5 ¼ AND 3 ¾ x 5
-Outdoor Denim, Pear and Slate Inks
-Fast and Furious stamp set (companion stamp to Later S8r
paper pack)
-Acrylic blocks
-Sponge Dauber
-Post-it Notes
The FIRST thing I ALWAYS do when I’m getting ready to create
any paper project is set a LARGE sheet of scrap paper on my VersaMat. I don’t know about you, but I make a huge MESS! I always stamp off my image until I get one
that I like; I never stamp the image on the actual paper until I’m completely
satisfied. I also love the look of inked
edges. And any of you who also love that
look, know how much of a mess it makes when those inked sponge pieces come off
the dauber. You’re also going to need to
remove some of the excess Slate Ink from the dauber by blotting it on a piece
of scrap paper. Even if you’re a
normally neat crafter, this can be a pretty messy card so you might want to
have a piece of scrap paper close by.
I prefer to ink the edges of my card. I did it with the Pear and White Daisy
cardstock pieces on this card because there was so much Slate Ink on the
stamped image, the white edges were kind of distracting. So I did that first and set them aside until
I was ready to put the card together.
I started with the “Crazy For Cars” stamp and I stamped it
slightly off-center. I used the Rock n’
Roll Technique with the individual stamped images. I stamped it in Pear Ink first and then
rolled the edges of the stamp in Outdoor Denim.
I love that our stamps are clear and you can see exactly where the ink is,
so if you want to add more to one part of the stamp, you can.
After you stamp the image, you outline the image with
Post-It’s. Use the sponge dauber to rub
ink around the edges of the stamped image.
Dip the dauber in the ink, then blot it on the scrap paper (just like
you might blot off excess lipstick when you’re putting on your makeup). I start the daubing process on the Post-it
because it helps control how much ink ends up on the paper. It’s easy to add more to make it darker, but
if you start out too dark, you can’t make it lighter.
Then the images I stamped in order were the tire tracks, the
dump truck, the race car, the beetle and finally the “beep”. For the dump truck and the race car, I put
the Post-It notes up FIRST. It allowed
me to get the image that I wanted, and also created the effect of the image
being behind another image (I love it
when cool things happen that you don’t initially plan.)
After all the images are stamped and sponged, then I put the
card together.
And voila! You have
an ADORABLE card for your favorite little guy!
Wednesday, February 13, 2013
Home, Sweet Home!
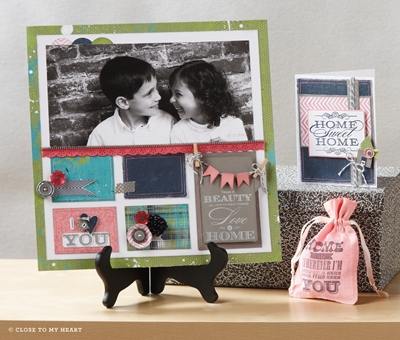
It's the February Stamp of the Month!! It's a beautiful sentiments stamp set. I love sentiments, because I love making cards. But you can see from the picture above, the amazingly talented designers at CTMH used it to embellish the new treat bags and scrap booking layouts!
My stamp is on order and I'm (impatiently) waiting for it to arrive so I can get those cards out of my head!!
This stamp retails for $17.95, but you can get it for only $5 with a qualifying order of $50! Go to paperprincess.ctmh.com to get yours today!
~Theresa
Wednesday, October 17, 2012
It's a Baby Girl!!
I love pink and black together (in case you hadn't noticed from my blog). I think it can be classy and girly and give great attitude all at the same time! I knew I wanted to use Roxie for this card because it does all that and more. I paper pieced her clothes and the baby carriage and used our Blending Pen to color in her skin and hair, the baby, the inside of the carriage and to add dimension to the ruffles on the back of the buggy.
I didn't go all out embellishing this card because I wanted the focus to be on the mom and baby carriage. I accented the flourishes on the patterned paper by using Liquid Glass. It added just the right amount of shine. I finished it off with a few pearls and a little bling in mom's ears (just because I think every woman deserves a pair of diamond earrings) and on the wheels of the buggy.
I hope my cousin likes this as much as I do!
Enjoy!
Theresa
Collect. Create. Contribute.
Friday, October 12, 2012
Simple Sympathy
This is my first attempt at a sympathy card. It was for my neighbor whose father passed away recently. Because it was for a man, I didn't want it to be overly embellished. I wanted it to be simple and slightly masculine. And I think I accomplished that. But this card means so much more to me than just simple sympathy.
This family is very special to me. I have a ten year old son with Autism and last year when we moved here, their daughter became his very first friend. Autism is a complicated disorder. But to put it very, very simply, it's a lack of social appropriateness. When he was diagnosed in 2008, he was non-verbal and he had violent fits. I focused on intense one-on-one therapy and on strict diet changes and slowly this boy emerged who knew who he was, but not how to connect with his peers. And when we moved to this house, it finally happened. This little girl treats him the way we all try to raise our children to treat others without seeing his disability as a liability. I could go on for days, telling you what an impact her acceptance of my son has done for us, both for my hope that he will one day be able to live an independent life and also for the things that she's taught him that I never could. But I'll save that for another day. So instead, I fell back to what I know. Which was putting my hands to work. I made them this card.
I love cards because they are a way to stay connected with our loved ones (just don't ask my mom, she'll tell you I don't call home enough). When we're happy, when we're sad, we just need someone to say, "I see you and I'm here." So until the end of the year, you'll see lots of cards. I have a lot of people in my life to celebrate - family members that I'm grateful for, birthdays to commemorate (my baby sister is practically going gray at the thought of turning thirty this year), and people who have helped shape the woman I've become and the direction my life is heading. And you'll probably see a few more sympathy cards on here, too. And I'll work on my picture taking skills so the photos aren't so dark. Enjoy.
Theresa
Collect. Create. Contribute.
Friday, October 5, 2012
*Wicked* Halloween Card
I made this card last year, but I HAD to share it with you. I LOVE Halloween! It is my FAVORITE holiday - and coincidentally both my husband's and my oldest son's birthdays.
I love how whimsical and girly this card turned out to be! Halloween doesn't have to be scary or gross or whatever Hollywood wants to turn it into this year. Even with the bats flying up from the bottom of the card and the raven on her hand, this witch is sassy!
Hope you enjoy!
Friday, September 28, 2012
Farewell Sweet Summer!!
Saturday marked our official passage into fall. So along with breaking out the sweaters and the scarves, I broke out my Footloose paper pack and made this card!
Fall is hands-down my FAVORITE off all four seasons. I love the crispness of the air, the warm, homey foods, the way the Earth sends summer off in a blaze of glory - literally. And October (my favorite month) is right around the corner!
But I wasn't quite ready to say "Adios" to summer. My youngest was born on June 6th, so I didn't really get a summer. My summer consisted of counting feedings and diapers and praying for nap-times (baby's too curious, he doesn't like to sleep).
I love the laid back feeling this card gives me. It's pretty simple - just like a day at the beach should be!
Hope you enjoy!
Fall is hands-down my FAVORITE off all four seasons. I love the crispness of the air, the warm, homey foods, the way the Earth sends summer off in a blaze of glory - literally. And October (my favorite month) is right around the corner!
But I wasn't quite ready to say "Adios" to summer. My youngest was born on June 6th, so I didn't really get a summer. My summer consisted of counting feedings and diapers and praying for nap-times (baby's too curious, he doesn't like to sleep).
I love the laid back feeling this card gives me. It's pretty simple - just like a day at the beach should be!
Hope you enjoy!
Tuesday, September 25, 2012
Pretty Stella Card
Isn't this card sweet? I got the pattern from Mojo Monday #234. The pattern inspired me and I knew I wanted to use our Stella paper, so I started cutting paper. It sat on my crafting table for a few weeks because I couldn't decide on the stamped image. Once I found the butterfly, I knew and ... A card was born!
Hope you enjoy!!
List of Supplies:
Stella Paper (X7147B)
Colonial White CS (1388)
Lagoon CS (X5762)
Creme Brulee Ink (Z2167)
Tulip Ink (Retired)
Lagoon Ink (Z2195)
Cocoa Ink (Z2114)
Bamboo Ink (Z2103)
A Little Thanks (D1444)
Find Your Style (Retired)
Hope you enjoy!!
List of Supplies:
Stella Paper (X7147B)
Colonial White CS (1388)
Lagoon CS (X5762)
Creme Brulee Ink (Z2167)
Tulip Ink (Retired)
Lagoon Ink (Z2195)
Cocoa Ink (Z2114)
Bamboo Ink (Z2103)
A Little Thanks (D1444)
Find Your Style (Retired)
Friday, August 24, 2012
Easy-Peasy Thank You Cards
I'm making Thank you cards!! My husband was thrilled to see my card-making stash cluttering up the kitchen table. He is the most well-mannered person I know and he has been all over my tush about getting Thank you cards made. We have a brand new baby at home and I haven't had the time - or the energy - to make cards. Our new little one is not a sleeper and that's also reeking havoc on my creativity. But since I had my stuff out (and the baby was softly snoring in his car seat), I decided to go for it!
I love the muted colors in the Florentine paper pack and thought it would be perfect for a thank you card.
Here's my product list. The only thing not pictured is my adhesive, paper trimmer and pop dots. I LOVE this stamp set! It's the perfect addition to the card-maker's arsenal. I also used the cards and envelopes from the Value Pack. They're already cut to size and scored. Such a time saver!!
Isn't this Thank You card cute? And I DID get it finished before my little one woke up! I plan on making a BUNCH of these cards during his nap times!
Hope you enjoy!!
I love the muted colors in the Florentine paper pack and thought it would be perfect for a thank you card.
Here's my product list. The only thing not pictured is my adhesive, paper trimmer and pop dots. I LOVE this stamp set! It's the perfect addition to the card-maker's arsenal. I also used the cards and envelopes from the Value Pack. They're already cut to size and scored. Such a time saver!!
Since I was going for easy (and I was time-crunched), I totally used the extra 1/2 inch border strip at the top of the patterned paper to my advantage! Whenever I cut smaller strips of paper to size, I'm always worried about the edges not matching up. But this was all from one piece of paper, so I didn't have to worry about that.
The pieces don't look like much now, but I always ink the edges. For this card I used Cocoa ink. If this is not a technique you're familiar with, you should definitely try it! I think it makes the finished product more elegant and helps to focus your eye...
...AND you have the makings of a super-cute card!
Next I stamped the sentiment. For the Thanks, I used the Rock 'n Roll technique. I stamped the whole image in Bamboo and then rolled the edges in Twilight. Super cute, right? But it was still missing some embellishing. I didn't want to add too much because I wanted the card to stay simple.
You can see at the top of the picture I considered using a stamped image. But then I flipped over one of the pieces of paper and decided to cut the floral images out. In order to achieve the same adorable embellishment, I would have had to paper piece them together and that would have taken the "Easy-Peasy" title away.
I put pop dots on one side of each embellishment and used regular adhesive on the other side and stuck them on the card at various angles. It gives the card a little bit of dimension.
Isn't this Thank You card cute? And I DID get it finished before my little one woke up! I plan on making a BUNCH of these cards during his nap times!
Hope you enjoy!!
Subscribe to:
Posts (Atom)